|
Stephen Burch's Birding & Dragonfly Website |
|
Home | Trip Reports | Gallery | UK index | Oxon pics | UK pics | Dragonflies | Other Nature | Links |
||
|
Stephen Burch's Birding & Dragonfly Website |
|
Home | Trip Reports | Gallery | UK index | Oxon pics | UK pics | Dragonflies | Other Nature | Links |
||
(November 2020 & updates up to January 2025)
For my initial review of the newer Canon R5 Mark II, go to this page! Contents
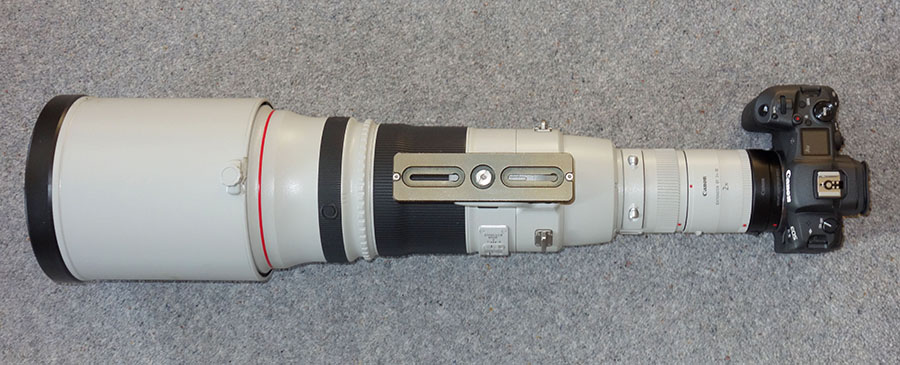
Introduction From sometime in 2019 I began to consider options for a better camera as it was clear the technology had moved on considerably since 2014. There wasn't an obvious replacement in the APC (1.6 crop) range of Canon cameras. I didn't want to move to a full frame camera with a similar number of pixels, as I feared I would miss the extra "reach" provided by the APC crop sensor. I even toyed with the idea of switching manufacturer to Sony (who appeared to be the market leader) or the Olympus micro 4/3 sensor cameras. But with a substantial investment already in Canon lenses I wasn't going to make such a major change in a hurry. In early 2020 I became aware of the rumours emerging of a new Canon "game-changing" full frame mirrorless model. The early specs were sketchy but the suggestion of a full frame sensor with a large number of pixels (or sensor elements) attracted my attention, as this would in theory provide a comparable reach to the APC sensor in the 7D II. As other details of the spec emerged I got very interested indeed and placed a pre-order with Wex Photographic on the evening of the day after its launch (June 10th). Little was I to know that this slight (less than 24hr) delay meant I would be waiting several weeks longer for it to be delivered! The first batch of R5's were due for delivery in late July but it was soon apparent Wex hadn't received a large enough batch to satisfy my order. And so it proved for the next batch in August. Finally after about 6 weeks of waiting, I got the news from Wex I had been waiting for and a few days later my R5 arrived! Fortunately I had ordered an ex-stock RF to AF mount adaptor from Clifton Cameras at the same time as my R5 pre-order as these were also in very short supply. Initial impressions Even after as little as two months, I was finding it lived up to all the hype surrounding its launch. It really did seem to be the "game changer" I was hoping for. The step up from the 7D II was not incremental at all, more like a quantum leap! Here is a list of the main advantages of this camera as I see them for bird and wildlife photography, as well as a few disadvantages: Advantages My experience to date is that this feature is indeed remarkably effective on perched birds and slowly moving subjects when it can find and lock-on to eyes even at a substantial distance. However rapidly and erratically moving targets are clearly more challenging, especially flying birds. For these the AF often fails to find the eye but will often correctly locate and lock onto the bird or its head. But it is not perfect and can sometimes lock-on to the wrong part of the bird (e.g. rear end or wing tips). There is also a slight lag to it, so that the active AF area may fail to keep up with a poorly tracked bird that is moving rapidly across the field of view. There are however some sensitivity and acceleration parameters that can be played with. After trying a few different combinations, by August 2021, I was using Case 1 but with the tracking sensitivity set to -2 and the Acceleration/Deceleration set to +2, having seen this recommended by others for birds in flight. The other key point about the AF is that it is not limited to f5.6 apertures or f8 (central focus point only) as my 7D II is, and as I believe most (all?) Canon DSLRs are. Hence I can use my 500f4 with my x2 extender (f8) and still get tracking across the whole field of view. This should also apply to the f11 combination of the f5.6 100-400 zoom lens with a x2 extender added, although I haven't tried it yet. Given that the animal eye detection AF is good but not infallible there is a need to be able to quickly switch to the more traditional spot/area based AF. Fortunately this can be achieved using double back button focusing, with one button for animal eye and another for spot/area AF. See below for how I've set this up on my R5. Autofocus - accuracy 45Mp Sensor and signal-to-noise ratio Of course smaller pixels are usually associated with higher image noise levels, but my own measurements of image noise level suggest the noise on the R5 is about one stop better than on the 7D II, when using Adobe Camera Raw for raw conversion, but prior to raw conversion, the two sensors have similar signal to noise ratios. DXoMark have now got round to testing the R5 and I show some comparative signal-to-noise ratio (SNR) plots at the bottom of this page. Seamless use with AF lenses Frame rate and buffer size I understand this discrepancy may be due in part at least to the ISO settings used for these tests as the size of the raw files increases with the ISO value. Hence Canon's tests are probably based on the lowest possible ISO, whereas I typically use much higher values which give larger files which fill the buffer quicker. The electronic shutter gives a remarkable fixed 20 frames/sec, regardless of batter type/charge. For fast moving subjects, the electronic shutter can suffer from rolling shutter effects. For this reason, I was initially very wary about using this mode. However as time has gone on, I find myself using it more often. But the rolling shutter effects are a significant issue - see below under Disadvantages/Limitations. The buffer size is correspondingly reduced when using the shutter option. Electronic view finder (EVF) The other important benefit of the EVF is that you still get a bright image even in low light conditions with a slow lens (e.g. with a x2 extender on an f4 lens). The slight downside is that usually the EVF has switched itself off when I first come to look through it, so that it is showing nothing but black! This is a bit disconcerting to someone used to a DLSR viewfinder which is of course always on. However if I remember to half press the shutter button as I raise the camera to my eye, the EVF will have fired up by the time I am looking through it. There are also limitations to the EVF performance when it comes to tracking fast-moving flying subjects, see below for more information. This a real benefit for getting low angle shots, without having to lie prostrate on the ground! It works pretty well as long as I can reach the camera to point it, engage the animal eye detection AF (via the back-focus button) and fire the shutter. Almost invariably the eye AF does it's stuff (although sometimes it is difficult to tell if it has locked on, with my eyes anyway), and the results can be excellent. The screen is also touch sensitive but I've not really experimented with this much - the buttons and dial wheels are generally more than adequate for me. In-body Image Stabilisation (IBIS) Shutter sound No micro AF adjustments Size and weight The lightness of the R5 compared with the 7D II is a more noticeable benefit with a lighter lens such as the 100-400 II zoom and less so with the heavier 500mm f4 II prime. Focus stacking in the field (for dragonflies)
Update 10 April 2023 When using the Canon EF 100-400 f5.6 II lens @ 400mm/f10, I have found a focus increment of 1 is probably best although an increment of 2 may suffice. With the Canon RF 100-500 lens @ 500mm with an aperture of around f13, an increment of 3 seems OK but perhaps surprisingly with the x1.4TC attached the increment can probably be increased to 4 (it is difficult to be definitive about these values). The number of shots needed depends on the depth of field needed to cover the whole of the subject. I usually use 30-40 shots for dragonflies. There is nothing more annoying to specify too few shots, and find that the far side of the subject remains out of focus at the end of the sequence! Note that for 40 shots, I have measured the depth of field after stacking to be about 140mm with the RF100-500 lens @ 500mm (increment of 3) but this drops to about 90mm when the x1.4 TC is used, even with a larger increment of 4. Using the focus bracketing option, I can dispense with the separate Helicon FB tube, fitted between the camera body and lens, that I had to use for collecting focus stacking shots with the 7D II. This R5 option automatically engages the electronic shutter which normally gives 20 frames/sec. However for focus stacking this slows down to about 11 frames/sec when using the Canon EF 100-400 f5.6 II lens. This is then only slightly faster than the speeds I was achieving using the Helicon device on the 7D II. However with the newer native mount Canon RF 100-500 lens, the 20 frames/sec for the electronic shutter is maintained, so the sequence collects about twice as fast as with the EF lens - a significant improvement which helps to improve the chances of getting a sequence without appreciable subject movement. You need to start with the focus point closer to you than any part of the subject as the incrementing takes the focus point further from you towards infinity. I don't find this a problem - as it is usually possible to auto-focus onto the nearest part of the subject and then move back a little. As well as the likelihood of subject movement during the sequence acquisition (wind is a killer here!), when hand holding there can be some strange distortion effects on the images collected. Others have mentioned this, although not necessarily in the focus stacking context. It seems to be due to some weird interaction between the camera's IBIS, the IS on the lens and the electronic readout (rolling shutter). This effect is reduced or even absent if using a tripod. It is also surprising how much the image jumps around in the EVF when collecting a hand-held sequence. Maybe this is just the result of my unsteady hands but maybe it is also due to the same effects that can cause the weird wobbling/warping ripple-type distortions in the images. All these issues make for a limited success rate when collecting hand-held focus stacking sequences in the field. Use of a tripod definitely improves the likelihood of success but does nothing to prevent subject movement. Nevertheless it is possible to get nice results when using appropriate focus-stacking software. The Helicon Focus 7 Stacking software is what I use for focus stacking on the computer. It has the advantage of tolerating significant amounts of movement between images (essential for hand-holding). Fortunately this doesn't seem to be a problem because the focus stacking software is remarkably tolerant of shifts between shots. For an example of a hand-held focus stacked image of a dragonfly obtained with the R5 and the Canon 100-400 f5.6 lens, click here. The ability to re-touch parts of the stacked image, by replacing selected areas with a particular image in the stack is also important. However these corrections do not help much if there are appreciable warping/wobbling effects caused by the rolling shutter (see above) Disadvantages and Limitations Rolling shutter effects Update 19
January 2025 Panning the camera while tracking a moving bird will lead to the tilting of vertical lines in the background. Also for smaller birds, their fast moving wings can cause very odd distortions. Of course, the slower and more noisy mechanical shutter is always available instead, with which riolling shutter effects are absent. The newer R3, the Sony A1 and the Nikon Z8 & Z9 all have stacked sensors with much faster sensor readouts and hence greatly diminished rolling shutter effects, as has the newer Canon R1 and the Canon R5 Mark II which was released in summer 2024. See here for my comments on this camera. Silent electronic shutter and hitting the buffer
Update 4 June 2023 The problem I encountered was that the electronic shutter is completely silent, so it is not obvious when the buffer limit is hit, and it stops collecting images. Recently while on the famous Mull Charters boat trip off the Isle of Mull, I couldn't understand why I kept missing the crucial few seconds of a White-tailed Eagle hitting the water and catching a fish. It was only after the last dive that I figured it out, by which time it was too late! It turned out I was tracking the bird in flight for much longer than usual, and firing away too soon, before the bird made its dive. By that time, more times than not, the buffer filled at just the wrong moment. Trying to reproduce this afterwards, I found that a "busy" message appeared very briefly in the EVF when this happened, but it wasn't at all obvious being the same colour as the all the other info. In contrast, with my much cheaper (but newer) R7, filling the buffer is much easier and, with the electronic shutter set to make a soft sound, it is immediately apparent when it occurs. Also the "busy" message flashes up in yellow - so is much more obvious than on the R5. So be warned! With hindsight, I should have set the file type to cRAW to increase the number of images within the buffer capacity and been more aware of the potential for this issue in advance. Of course, if we ever get back to Mull, I won't make that mistake again! EVF for flight shots Update 23
June 2022 Eye detection Auto-focus Update 25
May 2022 Freezing Update 25 May 2022 As of February 2022, I understand that the latest firmware update (1.5.1) is intended to fix this problem. After installing the update, I have never had the freezing problem, as of September 2023, so I conclude this problem has been fixed. Lack of firmware updates Update
September 2023 Price Memory cards Initially I was staggered by the cost of the CFx cards from Sony, Sandisk and the likes and went for the cheaper option of a 128Gb PROGRADE CFx card. With this card, for which a sustained write speed of "only" 140 MB/sec is quoted, I found the buffer was getting filled after only about 60-80 raws. This was fine for a few months, but I then started to hit the buffer limit increasingly often, so I decided to fork out on a 128Gb Sony Tough CFx card, which is supposed to be THE one to go for. However, even with this card I find the buffer fills after typically about 100 raws, compared with the 180 figure claimed by Canon. The R5 also has a slot for SD cards and is compatible with the latest UHS-II cards as well as all the older standards SD, SDHC and SDXC UHS-I. Even the UHS-II SD cards are slower than the fastest CFx cards but are more economical! Of course it is perfectly possible to use the the SD card slot as a backup for when the CFx card becomes full. In this case, even use of a standard very inexpensive SD card with high capacity might serve this purpose (but the buffer limit is then substantially reduced and if full the buffer takes ages to clear). File size I haven't tried the Canon CRAW (compressed raw) format yet as this involves a lossy compression which apparently reduces the file size by about a factor 2. I reckon if I can cope with the full raw files, why bother with the possible loss of quality that CRAW involves? Battery Life But on occasion, I find it very useful to leave the screen on continuously showing the live image for extended periods, e.g. when waiting for fast moving birds such as tits to land momentarily on a perch. In this mode, the battery drains away quite rapidly and the "green" fastest shooting mode can be lost after only about an hour or maybe slightly longer. Having some spares is then essential for a prolonged session. The special, slightly higher capacity battery that comes with the R5 (LP-E6NH) is very expensive and additional ones were originally unobtainable. Fortunately the R5 is also compatible with the older batteries that my 7D II uses (LP6-E6N). So to get a new spare I purchased another new Canon LP6-E6N, which are pretty pricey for a battery. Subsequently I've forked out on another LP-E6NH as it is now (August 2021) available ex-stock. Note that the full 12 frames/sec with the mechanical shutter is only obtainable using the R5 battery (LP-E6NH) or the older LP-E6N 7D II battery. Generic third party batteries are mostly the even older LP-E6 type which don't give this highest frame rate. Also the battery needs to have a good level of charge in it, to give the "green" H+ shooting symbol, which indicated the full 12 frames/sec. Somewhere just below 50% charge the green changes to black which indicates a slower frame rate of only about 8-9 frames/sec.
Number of pixels/reach However the newer Canon R7, which I have now purchased, has a 33Mp crop sensor. This gives the R7 about 1.4 times the reach of the R5, which is approximately equivalent to that of x1.4 extender. Hence for situations needing maximum reach, I tend to use the R7 over the R5. I find that even on the 500f4 with the x2 TC, the R7 gives a slight improvement in reach than with the R5. Also the R7 is a little lighter than the R5. Settings and
buttons As these videos cover the R5 settings in great detail, I'm not going to repeat those I use here because I largely followed their recommendations (which reassuringly generally agreed well with one another). One of the many advantages of the R5 is that it allows a lot of flexibility on how the various dials and buttons can be configured. After a bit of trial and error, I'm now using a combination which I find works well for me, and isn't exactly the same as the suggestions on either of the above videos. So I thought it might be of interest to give the button configuration I use here.
Workflow and processing
Update 19 January 2025 Since I got the R5, I have tried various different software options and workflows and so I thought it might be of interest to outline my current procedure, as of February 2022: 1. FastStone Image Viewer - for short listing files After running through all the files from a session, I can then view just the tagged images and then drag them into a new "Short list" folder. Given the number of files generated by the R5, a fast an easy to use tool like this is really important. And its free! I then use FastStone to create "basic" jpegs from all the raw files in my short list folder. It is amazingly quick at generating these jpegs compared with Canon's DPP4 software - mainly because it is simply extracting the embedded jpeg image from the raw file. For the R5, this jpeg has the full image resolution, unlike with some other cameras, I understand. 2. Photoshop CS - for viewing the short listed files to make my
selection 3. Photoshop CS Adobe Camera Raw (ACR) - for raw conversion My measurements of the R5 image noise level suggested that Adobe Camera Raw (ACR), as in Lightroom and Photoshop, gave slightly lower noise levels than the present version of DPP4. Hence I started by using ACR as my raw converter of choice for the R5 but then found that the resulting colours were suspect when using the standard camera profiles provided by Adobe. Hence I switched to using DPP4. But now I have returned to using ACR in Photoshop since there some alternative camera profiles available which seem to do a better job. These include those from Colour Fidelity and, probably better, the numerous "prosets" available from Jan Wegener. Of all these prosets it is isn't obvious which one to use, but I tend to usually go for "Jack of All Trades" or "Jack of All Trades - Vivid". 4. Noise reduction But more recently it became clear that there were newer more effective NR tool available and in late 2022, I purchased Topaz denoise AI, given a discount available as part of the Black Friday sales. I was instantly impressed and purchased a licence which allows me to use it as a plug-in within Photoshop. This is noticeably better than NeatImage in terms of noise reduction (especially in the background of the image). It also has a useful option for sharpening that is quite effective, as long only a moderate amount is needed. Unlike DxO PureRaw (see below), both the amount of noise reduction and sharpening are readily user controllable, and the image preview that shows a slider that be moved to reveal more/less of the processed image is a very effective tool. Then in September 2023, I also acquired DxO PureRaw 3 (having earlier had the first vesion DxO PureRaw) which can process files from both my R5 and R7 cameras (the initial version couldn't handle R7 files). This followed a recent Jan Wegener YouTube video in which he found DxO PureRaw 3 to be the best option for very noisy (i.e. high ISO) images. DxO PureRaw 3 is less convenient to use as its not a Photoshop plugin, being instead standalone software that outputs the image as a *.dng file. This can then be imported into Photoshop as a raw file. DxO PureRaw 3 has two options. I usually used the more advanced but slower one (DeepPRIME XD). This runs in a reasonable time using my graphics card for the processing. More recently (autimn 2024), I moved onto DxO PureRaw 4, as it is marginally better than the earlier version 3. I also upgraded my entry level graphics card to a medium level RTX 4060, which gave substantially reduced processing times (by factors of between 2 and 6 depending on the routine) over my previous GTX 1650 card. I now use DxO PureRaw 4 for most of my images, which I oftern follow with Topaz denoise AI. It is also worth mentioning that Photoshop now also has its own AI noise reduction tool available as well. It seems quite effective to me, and it now much faster to run using the RTX 4060. But I still tend to use DxO PureRaw 4. Note I have resisted a move to the newer Topaz Photo AI, as it is very expensive and a review I saw didn't rate it as being any better than the older separate Topaz NR and sharpening modules I already use. 5. Photoshop CS - for image editing My editing techniques have also evolved rapidly, and are now based on the multi-layer approach as described in Jan Wegener's Master Class video, which I can thoroughly recommend, if you have plenty of time available for post processing! These techniques really do help you get the most out of your image, and opened my eyes to what was relatively easy to do. Not maybe for everybody, especially those looking for a fully "natural" look. 6. Sharpening Instaed, I now often use the Topaz Sharpen AI software which I run as a plug-in to Photoshop, if the image is noticeably "soft". I find this software can be very good at "rescuing" or noticeably improving images that I might previously have binned. With this routine, I find it best to use the "Out of focus - very blurry" option, with the "Remove Blur" parameter turned right down to something in the 5 to 15 range dependng on the amount of sharpening needed. I find the "Out of focus - normal" option introduces too much high frequency spurious detail to be worth using. Note that if I think this software will be needed later on, I avoid sharpening the image with the Topaz Noise reduction back at the start of the processing. For images that are already fairly sharp, I often find the
sharpening available within the Topaz noise reduction software is
sufficient, and may even give better results than the dedicated Topaz
sharpening software which I apply at the end of the workflow. Examples The R5 has performed well virtually every time I've used it so far, and has been particularly impressive when stretching the "reach" to its limits when my targets have been a fair way off. The animal eye detection AF is well illustrated by this photo of two Kestrels. This was taken with the 500mm f4 II lens with a x1.4TC (mark III) at a pay hide, so distance wasn't the issue but this pose was only held for a fraction a second after I got onto the birds. The animal eye AF went straight to the immature's eye and I got two frames before the pose changed. Of these this is second which is slightly sharper than the first.
My second example is from a local site without a hide. For this photo I was using the 500f4 II with the x2 TC (mark III) and this Kingfisher was a considerable distance off. As the light wasn't brilliant I was using ISO 4000 and the aperture wide open at f8. Viewing the image at 1:1 magnification the image sharpness was very good even with the use of the x2 extender. Given the crop used, combined with the 1000 mm focal length lens and extender combination, the effective focal length of this photo is over 3000mm! It is also worth mentioning that the colours on this photo look considerably better on this DPP4 converted image than on the ACR processed one I originally generated (but note my comments above about using better camera profiles in ACR).
My final example is from a another local site where there was a small flock of Crossbills feeding in the top of a tall conifer. I was well back from the tree, so the distance to the bird must have been tens of metres. Again I was using the 500f4 II with the x2 TC (mark III) but this time it was mounted on a tripod. The full frame shot straight out of the camera below shows how small the bird is in the field of view.
The result after processing using my workflow detailed above is given below. This is close to a 1:1 crop and again shows impressive levels of detail considering the distance to the bird and the use of the x2 extender. Again the colours on this photo look considerably better on this DPP4 converted image than when using ACR.
The example below of a flying Red Kite was obtained using the 100-400 II zoom lens. These rapidly moving and changing targets presented much more of a challenge for the animal eye detection AF and in this early session with the R5 it generally failed to find the eye. I think the overall shape of a flying bird is much more variable than one perched and this is sufficient to confuse the AF. It generally tracked the bird as a whole well but sometimes locked onto the wrong part such as the wing tips or tail. It is possible with tweaks to the AF settings it would be more effective in these circumstances. Also since then, a firmware update has noticeably improved the AF's performance in situations like these. But some shots were pretty sharp as this crop illustrates below.
Signal-to-noise (SNR) plots from
DXOMARK Of more interest to me are their signal-to-noise ratio measurements, which are derived from the raw sensor data, before demosaicing, and hence are not subject to the vagaries of the raw converter. For information on my own measurements of this important parameter, see here. The plot below shows the DXOMARK measurements of SNR 18% as a function of ISO setting for my three most recent Canon cameras - the R5, 7D mk II and the 7D. Note these measurements were revised significantly by DXOMARK in 2024, and show the R5 in a less favourable light than the erroneous previous results!
The DXOMARK results given above now show that the R5 has a similar SNR to the 7D II, and only about half a stop better SNR than my 7D which was released in 2009! These findings are now roughly in-line with my own measurements of image noise level. Also of interest is the next plot below that shows the R5's SNR compared with two other notable full frame Canon DSLRs - the top of the range 1DX Mk III and the 5DS, which has a similar number of pixels to the R5.
The above plot shows that the R5 gives very similar SNR values to the 5DS, which has a similar sensor element (pixel) size. However, as should be expected, the larger sensor element (pixel) size of the 1DX Mk III gives appreciably higher SNRs (by over 1 stop). It is also interesting to compare the SNR values for the R5 with those of its main competitors with similar sensor resolutions (i.e. 45-50 Mp). The plot below shows DXOMARK's revised SNR values for the Canon R5 compared with the Sony A1 and the Nikon Z9.
The plot above shows that all three of these high-end cameras, with similar sensor element sizes, give very similar SNR values.
|
Home | Trip Reports | Gallery | UK index | Oxon pics | UK pics | Dragonflies | Other Nature | Links |